
If you love roses (gulab) and want more of your favorite varieties, you don’t have to start from seeds. In fact, most gardeners prefer vegetative methods because they’re faster and give you an exact clone of the parent plant. Below, you’ll find simple, proven ways to propagate roses at home without seeds using cuttings, layering, and budding plus aftercare tips, a quick reference table, and FAQs.
Why Grow Gulab Without Seeds?

- Clones of a favorite bloom: Seed-grown roses can vary; cuttings and layering give you the same flower color, scent, and growth habit.
- Faster results: Vegetative methods usually establish and bloom sooner than seed-grown plants.
- Cost-effective: Turn one plant into many with basic tools.
- Reliable success: With the right technique and timing, success rates are high.
Tools and Materials You’ll Need
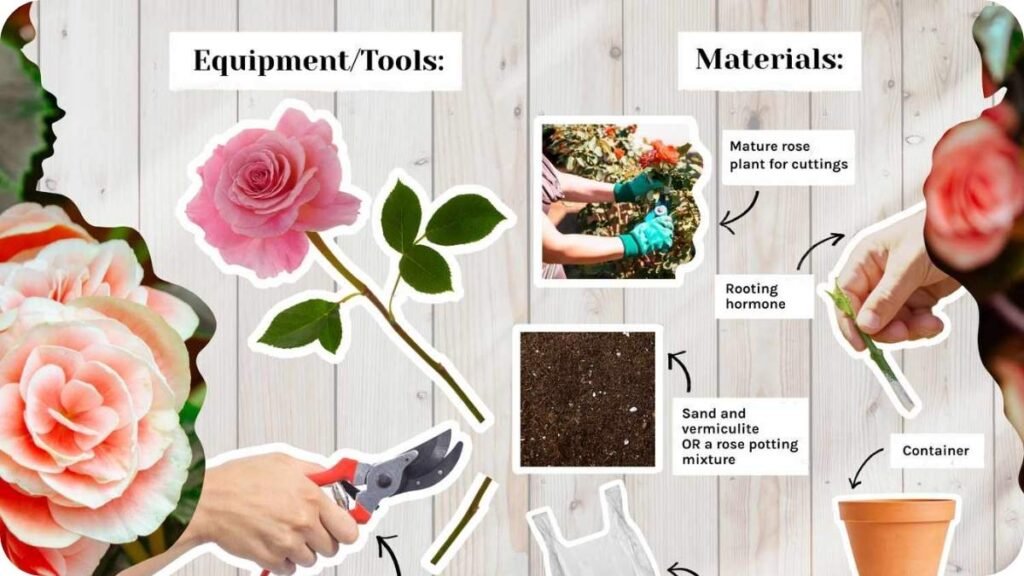
- Clean, sharp pruners or a knife (sanitize with rubbing alcohol)
- Rooting hormone (powder or gel)
- Small pots or nursery cells with drainage
- Well-draining propagation mix (like 50% perlite + 50% peat moss or coco coir)
- Clear humidity dome or plastic bag
- Spray bottle for misting
- Sphagnum moss (for air layering)
- Plastic wrap and garden tape (for air layering or budding)
- U-shaped pins or bent wire (for simple layering)
- Plant labels and a pencil
- Optional: heat mat to keep media at 70–75°F for faster rooting
Method 1: Stem Cuttings (Fast and Reliable)
This is the go-to technique for most home gardeners.
- Choose material: Pick healthy, non-flowering stems from current season growth. Semi-hardwood (slightly firm, not soft) works great in late spring to early summer; hardwood cuttings can be done late fall to winter.
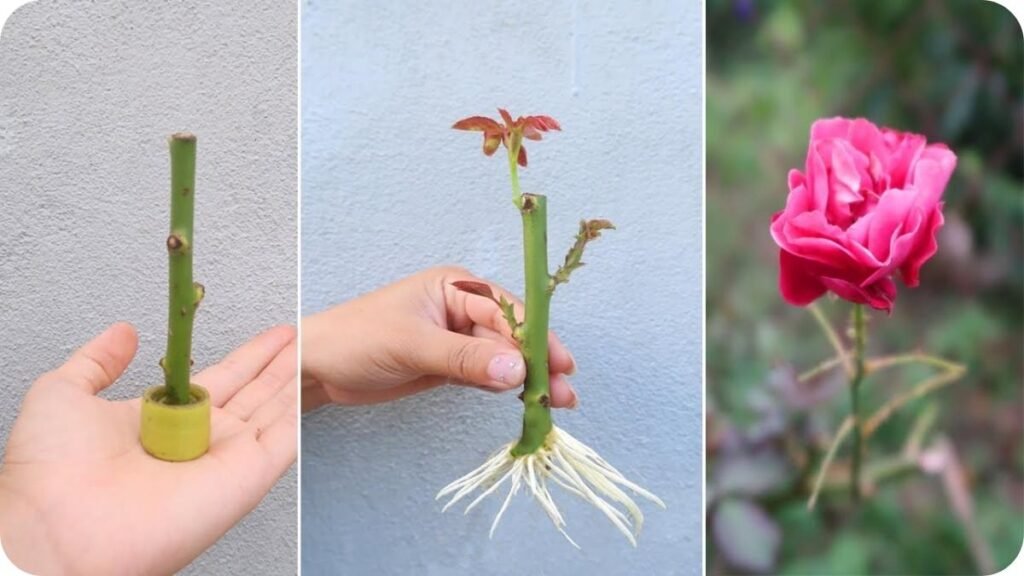
- Make the cut: Take a 6–8 inch cutting with at least 3 nodes. Cut just below a node at the base and just above a node at the top.
- Prep the cutting: Remove blooms and lower leaves, leaving only the top 1–2 leaflets. Lightly scrape a thin strip of bark on one side near the base to expose the cambium.
- Apply rooting hormone: Dip the base into rooting hormone and tap off excess.
- Pot it up: Insert the cutting into pre-moistened propagation mix so at least 1–2 nodes are buried.
- Create humidity: Cover with a clear dome or a loose plastic bag (not touching leaves). Keep in bright, indirect light.
- Maintain: Keep media evenly moist (not soggy). Ideal temperature is 70–75°F. Vent the cover daily to prevent mold.
- Check rooting: In 3–8 weeks (varies by variety and season), do a gentle tug test. Resistance means roots are forming.
- Pot up and acclimate: When roots are 1–2 inches long, transplant to a slightly larger pot with quality potting soil. Gradually increase light to morning sun.
Method 2: Simple Layering (Zero-Fuss for Beginners)
Layering roots a stem while it’s still attached to the parent, so it gets a constant supply of water and nutrients.
- Select a flexible, low cane and bend it to the ground.
- Make a small notch on the underside of the stem where it will touch the soil.
- Dust the notch with rooting hormone and bury that section 1–2 inches deep.
- Pin it in place with a U-shaped pin or bent wire; leave the tip exposed.
- Keep consistently moist. In 6–10 weeks, roots usually form.
- Cut the new plant free from the parent and pot it up.
Method 3: Air Layering (Great for Woody Canes)
Use this when stems are too rigid to bend, or you want a larger, ready-to-go plant.

- Choose a pencil-thick cane. About 12–18 inches from the tip, remove a 1-inch ring of bark (down to green cambium).
- Apply rooting hormone to the exposed area.
- Wrap a handful of moist (not dripping) sphagnum moss around the wound.
- Cover with plastic wrap to hold moisture, then a layer of foil to block light.
- Check weekly to ensure the moss stays moist. Roots generally appear in 6–12 weeks.
- Once a strong root mass is visible, cut below the layered section and pot carefully.
Method 4: Budding and Grafting (For Enthusiasts)
Budding is standard in commercial rose production and lets you combine a favorite flower with a vigorous rootstock.
- T-budding (late summer): Choose an active rootstock with “slipping” bark. Make a T-shaped cut on the stock. Slice a shield-shaped bud from your chosen rose (scion), slide it under the bark flaps, and wrap snugly with budding tape. After 2–3 weeks, if the bud looks plump, head back the rootstock above the bud to force growth.
- Whip-and-tongue grafting (late winter/early spring): Join a dormant scion to a dormant rootstock with matching cuts and secure tightly. This requires practice but can be very effective.
Aftercare: From Rooting to Blooming
- Light: Provide bright light with gentle morning sun. Avoid harsh midday sun until the plant is well established.
- Water: Keep soil evenly moist but never waterlogged. Let the top inch dry between waterings once established.
- Feeding: Start a light, balanced fertilizer 6–8 weeks after potting up. Use a slow-release fertilizer as growth ramps up.
- Pinching and pruning: Pinch the growing tip after the third set of leaves to encourage bushiness.
- Hardening off: If rooted indoors, gradually introduce outdoor conditions over 7–10 days.
- Winter care: In colder zones, mulch the base and protect young plants from hard freezes.
Common Mistakes to Avoid
- Overwatering cuttings, leading to rot
- Direct, hot sun on fresh cuttings or air layers
- Skipping tool sanitation (spreads disease)
- Using very soft or overly old wood for cuttings
- Letting humidity get too high without ventilation
- Impatience disturbing cuttings too early
Quick Reference Table
| Method | Best Season (U.S.) | Typical Rooting Time | Key Tips | Difficulty |
|---|---|---|---|---|
| Stem Cuttings | Late spring to summer | 3–8 weeks | Semi-hardwood stems, high humidity, 70–75°F | Easy |
| Simple Layering | Spring to early fall | 6–10 weeks | Notch underside, pin firmly, keep moist | Very easy |
| Air Layering | Late spring to summer | 6–12 weeks | Ring bark, sphagnum wrap, seal moisture | Moderate |
| T-Budding | Late summer | 2–4 weeks to take | Bark must slip, wrap snugly, force bud later | Moderate |
| Whip Grafting | Late winter/early spring | Union in 3–6 weeks | Precise cuts, firm tie, match diameters | Advanced |
FAQs
Q: Can I root roses from a store-bought bouquet?
A: Sometimes, but success rates are lower because stems are often treated and older. Use fresher, greener sections, refresh the cut, and follow the cutting steps closely.
Q: Do I need rooting hormone?
A: It’s not mandatory, but it noticeably improves success and speed. Look for IBA-based powders or gels and use as directed. Natural substitutes are less consistent.
Q: How long until a propagated rose blooms?
A: Many will bloom within 6–12 months depending on variety, vigor, and growing conditions. Prioritize root and branch development before pushing for flowers.
Q: Why are my cuttings turning black or mushy?
A: That’s usually rot from excess moisture, poor airflow, or cool temperatures. Sanitize tools, improve drainage, vent the humidity cover daily, and avoid overwatering.
Q: Which roses root most easily?
A: Shrub roses, many old garden roses, and miniatures tend to root readily. Some hybrid teas and grafted types can be slower; layering or budding may work better for those.